
- Products
- Rackmount LCD Keyboard
- Rackmount LCD Monitors
- Industrial LCD Displays
- Broadcasting LCD
- Kiosks
- Open Frame Touch Monitors
- Chassis/Wall Mount LCD
- Panel Mount LCD
- Flush Mount LCD
- LCD Stainless Steel Monitor
- NEMA 4X (IP65) Displays PC
- NEMA 4X (IP65/IP66) Displays
- NEMA 6X (IP67) Displays
- SunLight Readable LCD
- All-Weather Outdoor LCD
- Panel PC (5.6"-43")
- All in One PC
- Touch Screen Display
- Rugged Industrial LCD/PC
- Digital Signage LCD
- LED Signage Display
- Military Rugged LCD
- Marine Rugged LCD
- Tablet Rugged PC
- Medical LCD Display
- Medical Panel PC
- Industrial Embedded Computer
- LCD Wall/Ceiling Mounts
- Micro Environment Monitoring System
- Industries
- Support
- Knowledge Base
- Technical Support
- Sales
- Frequently Asked Questions (FAQ)
- Video Gallery
- i-Tech Blog
- Product Catalog
- Quick Download
- AUO Panel
- AVP Rackmount Series
- BCH and BCPC Series
- BHK Series
- BMPC Drivers
- CCH/CCPC/COP/CPM Series
- DigiView/ DKP series
- DCH/DVM/DCP Series Guides
- DHK series
- DMM Series
- DOD Series
- EIRMT IR touch Drivers
- ELD
- E series Intel Industrial Motherboard Mini-ITX
- EOP/ECH/EPM Series
- FD Series
- GOP/GCH/GSK Series
- KPC/KSP/KCH Series
- Netview Accessories
- Nmil Series
- OE Series
- PNPC Series
- QPC Series
- SCH series
- Touchscreen System
- VCPC/VDPC/VMPC/VPC Series
- WRD/WPM/WMRM Series
- YCH/YPM/YOP series
- Contact Us
- Inquiry
- News
- About Us
- Testimonial
IP65/NEMA4 Panel Mount (Aluminum-6mm) 8.4 " LCD Monitor LED VGA+DVI Input, Rear OSD, 4-Wire Resistive Touch (Model: YPM0840PHB )
, 8.4 \" LCD monitor LED VGA + DVI Input, Rear OSD including rear Clamp mount/VESA Mount,rear OSD, 4 wire resistive touch with USB controller")
IP65/NEMA4 Panel Mount (Aluminum-6mm), 8.4 " LCD monitor LED VGA + DVI Input, Rear OSD including rear Clamp mount/VESA Mount,rear OSD, 4 wire resistive touch with USB controller
X
Inquiry/Quote Request


- Overview
- Specifications
- Download

Features: |
|
Clamp Mount |
 |
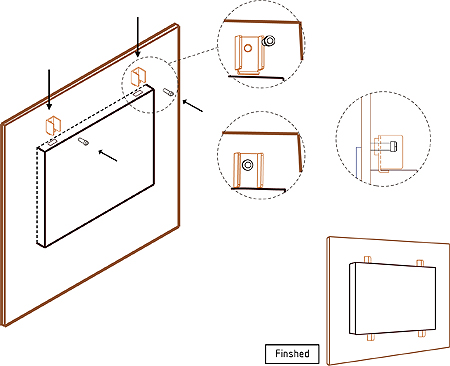
Installation Guide for Panel Mount Product: |
| You better have at least 2 people to do the installation. One is at the front side of the mounting wall, another is at the back side of the mounting wall. |
 |
| 1. Get the Mechanical Drawing : You can get the mechanical drawing of your product model from our web site : www.itechlcd.com . If you can't find the correct mechanical drawing, contact your local dealer. 2. Make the cut out : There is the cut out dimension in the Mechanical Drawing. Make sure your cut out meet the cut out dimension requirement. If the cut out is too small, there will be some interference. If the cut out is too big, you can't have the panel mounting securely. Please note that there is thickness limitation of the mounting wall for panel mount installation. 3. Prepare the accessory : For panel mounting kit installation, you will receive mounting kits and screws together with your unit and you have to prepare the screw driver by yourself. There are at least 2 mounting kits for each side of the panel. The mounting kit and the screw is paired. 4. Installation : 4-1. Put the monitor in the cut out from the front side of the mounting wall. The best way to mount the panel is to align the bottom of the panel housing with the bottom edge of the cut out. This way can help hold the panel steadily. |
 |
| 4-2. At the back side of the mounting wall, insert the mounting kits into the slide hole at the side bracket on the panel. 4-3. Put the screw on the mounting kits and screw it tightly. 4-4. Finish all the mounting kits one by one then you can have a secure installation for your Panel Mount product. |
 |
| System Specifications | |
| Panel Type | 8.4-inch TFT LCD |
| Screen Diagonal | 8.4-inch |
| Active Display Area (mm) | 170.4 (H) x 127.8 (V) |
| Pixel Pitch (mm) | 0.213 x 0.213 |
| Number of Pixels | 800 * 600 |
| Contrast Ratio | 600:1 |
| Color Arrangement | R.G.B. Vertical Stripe |
| Brightness (cd/m²) | 1000 cd/m² *without touch screen |
| Viewing Angle(Typ.) | 80/80/80/60 (R/L/U/D) |
| Signal Connector | 15 PIN D-Sub, DVI-D |
| Power Source | AC100 ~ 240V, Universal +/- 10% |
| Power Consumption | 18 W typical, normal operation |
| Power Management | VESA DPMS Compliant |
| Operating Temperature | -30°C ~ 85°C |
| Storage Temperature | -20°C ~ 60°C |
| Plug & Play | VESA DDC 1/2B |
| Touch Type | Resistive Touch Screen |
| Transparency | > 80% (typ.) |
| Hardness of surface | 3H |
| Linearity | ±1.5%(max.) |
High Quality Parts
i-Tech company uses only the best Industrial LCD and High Quality embedded Panel PC parts along with rugged components in USA or imported from Korea and Taiwan , for most reliable quality that you can trust!

Customer Service
i-Tech customer service reps are here to help you with your inquiry for Industrial monitors, panel pc, and outdoor LCD. From any general questions to technical support, we leave you feeling completely satisfied with our excellent LCD quality as well.
US Based Company
Most of i-Techs High Brightness LCD and Rugged Panel PC Products are assembled, tested and shipped from our very own factory in CA USA, giving us the ability to customize the systems to your needs.